1.29.2015

Rustic Chic Oscar Party with Free Printables

This is a sponsored post written by me for Cost Plus World Market... my BFF for new affordable home stuff.
So, are you going to watch the Oscars? Are you a movie lover and vowed to watch all of the Best Picture nominees before the show? Do you not care and just tune in for the clothes and an excuse to drink wine? ;) Whatever your Oscar style, The Academy Awards are a great reason to have some friends over, sip a few libations, and share a bite or ten.

Last year I designed some Oscar Party Printables in sort of a glam gold traditional Oscar style. This year I decided to change things up a bit. Lots of you know I'm in the midst of building a house. In my head, it's going to be a country chic modern farmhouse mixed with a little sparkle. In reality it's a pile of dirt and rebar at the moment... but not for long. In preparation for the day when I can finally paint and bring in the pretty stuff, I've been pinning my butt off and rustic chic is definitely the direction I'm headed. Needless to say, I've been rather inspired by rustic chic modern country design lately and decided to design this year's Oscar party to match.

Click the links ahead to download the invitations (these will print out 2 on a sheet), voting ballots (2 on a sheet also), and drink tags (6 on a sheet).

Once you've got your invites sent (I left space so you could add your par-tay info) head to World Market! For years I've been shopping there for home decor and furniture but they've got a really great selection for entertaining essentials as well. I headed out early on a Saturday morning and practically had the store to myself. Kid-free, coffee in hand, unhampered shopping– this could be what heaven looks like.


The hardest part was not filling my cart. These hand-stamped serving pieces really caught my eye. The imperfect hand-stamped lettering really gives them a rustic feel while still being fancy enough for a party. I put a couple in my cart and took pictures of the rest... because normal people do that.


After picking up a new cheese board, some napkins, and my gorgeous new butler's tray (more on that later) that I moved on to the ginormous food and wine section. I could shop here for hours. I settled on a few quick appetizer bites, like Volpi Prosecco Salami from Italy to pair with my cheese, some specialty chocolates for dessert, and wine.


To keep with the rustic chic theme, I tried to pair sophisticated/glam/sleek items with more textural and natural elements. Here the circular cheese board is paired with the sleek tasting plate and vintage-style serving tongs.


And I framed the pretty invite in a rustic Arabella Vintage Frame.

Serving a sparkling wine with store-bought appetizers always ups the glam factor too. I purchased Risata Moscato d'Asti because I like my bubbly on the sweeter side.


And my Pièce de résistance, the Gold Mirrored Butler Tray. If one item says both chic and rustic at the same time, this is it. The top is an antiqued mirror while the frame is a distressed gold finish.

I love the detail on the little metal frame around the outside and the fact that it's substantial enough to act as a side table also. And the best part?  Drumroll.... 


The tray part comes off the stand! Oh, the possibilities. Seriously, I can't wait for our new dining room to be done just so I can move this in. Also, if you're wondering, the lovely teal chair in the background is also from World Market. I might have treated myself a few months back :)


Last but certainly not least is the assortment of specialty chocolates I got for dessert. There were dozens to choose from. So far the strawberry one is my favorite but I plan to taste test every single one and report back... all for you guys of course.


So are you inspired to throw a rustic chic Oscar get together of your own? It really is the easiest of parties to throw. Late enough that you don't have to serve dinner, the entertainment is on TV, and it's on a weeknight so no one stays too late. It's a win- win- win if you ask me. haha. To help you get in the movie-loving spirit, World Market is hosting the Movie Lovers Sweepstakes. If you head over you can Enter to win one of 4 Weekly Grand Prize Packages:
  • Free Movies for a Year (2 tickets per week for 52 weeks)
  • $1,000 World Market gift card
  • 4 prizes available
Make sure to take pictures at your Oscar shindig and share them using the hashtag #MovieLovers so I can see what you did! :) Happy watching.


1.26.2015

The Boxtrolls Movie Night with Free Popcarn Box Printable

This post is part of a social shopper marketing insight campaign with Pollinate Media Group® and Universal Pictures, but all my opinions are my own. #pmedia #BoxtrollsFamilyNite http://my-disclosur.es/OBsstV

So I feel like my oldest kid is right on that line of thinking I'm the coolest person ever and being totally embarrassed by me. At the ripe old age of 7, my "I love you"s out the car window in the mornings get a stabbing side-eye instead of a loving response in front of classmates. Holding hands? Not if there is a chance someone her age might see her. Heaven forbid they think she is a "baby". But at home I get asked to play school, or dolls, or barbies hourly. She loves to have me read to her, and brush her hair, and snuggle at bedtime. I know little by little, those things too will go in favor of independence and teenage rebellion, but right now I'm hanging on. That's why making time for family activities now is kind of a big deal.

This week, thanks to some chilly weather and seemingly never-ending rain (I thought I lived in The Sunshine State?), we planned a family-tastic movie night at home along with do-it-yourself snacks, and an easy craft to help keep those snacks out of your couch cushions. 
I started at Walmart on my lunch break the other day because I knew that The Boxtrolls came out on DVD this week (plus we needed TP).  I've mastered the whole park at the garden center and run through the back isles technique to make sure I make it back in time for those 1:00pm meetings. So, while gripping TP with my elbow under one arm, and balancing some groceries with the other, I added the DVD and some Pop Secret to my pile then cruised through checkout like a working mom ninja.

Next, I designed a little popcorn box printable in the style of The Boxtrolls to make with the kids before the movie. Click here to download the free PDF.  The box will print out on two pieces of paper. It would be awesome if you had card stock, but no sweat if you don't. We used crappy printer paper and it worked just fine. You'll just need some scissors and a glue stick to assemble. Relatively mess free. Score.

Here's what you do.

Step 1:
Cut out both pieces of the box.

Step 2:
Fold the sides of the box inward (the outside has the printing on it... the inside is white). There are 2 sides on each piece for a total of 4 sides.

Step 3:
Fold all the flaps in.

Step 4:
On each piece, add glue to the flap that's between the two printed squares and stick them together. Don't glue the other flap yet.

Do this for both printouts so you have something that looks like this.

Step 5:
Join both pieces together. It doesn't matter which piece is on top when they slide together. Just add some glue to the other flaps now and between the bottom pieces and you're in business.

Once our boxes were assembled, we filled 'em up with Pop Secret and added a few sweet mixings as a special treat. You can get The Boxtrolls DVD and the same 10-count box of Pop Secret Home-Style Popcorn I got (it's yummy) at Walmart while supplies last. You know you'll be there this week getting TP and shampoo anyway. ;)

We not only had family snuggle time while watching the movie but cracked jokes, talked about school, and laughed a lot while making the boxes and the popcorn too.

There's even a spot on the side to write your name.
I also made up a quick "popcorn" banner too while I was in the design mood. Click here to download the banner.

Now someone lay off the fast forward button because she just can't possibly be this old already.

1.18.2015

How to Make Zippered Pillow Covers


Navy, gray, and gold... with pops of teal. I've been planning our master bedroom in my head for months now. A few weeks ago I posted the duvet cover I bought in a post-Christmas stupor from Urban Outfitters on Instagram. Did you know they sell house stuff? I didn't until recently and find it way better than their, ahem, clothes. Anyway, it's navy and on backorder until February (booooo!). So, while I patiently wait for the thing, I decided to recover the two pillows that have been on our bed forever so they'd jive if it ever arrives. That's a lie... they're only on the bed when we make the bed which is like 4 times a month. It's really like, the pillows that are always on the floor in the corner.

Here's what they looked like before. Brown with white waves on one side and white with brown waves on the other. Totally not good with my soon-to-be navy loveliness.


They first made an appearance way back in one of my first blog posts when I made our duvet cover in our old house. Aww, memories (and bad photography). Very beige and brown.

Time for a change! Let's get started. Follow along and make your own.

Step 1:
Figure out what size your pillows will be. 
I took the old covers off the old pillows and measured. Super easy. They were 26" square so I added a couple inches for seams and mess-ups and cut my fabric 28" square.  To make two pillows you'll need 4 squares of fabric (2 fronts and 2 backs).


I chose a bright blue and green ikat for the fronts and leftover fabric from the curtains I made for our bedroom on the back. This way I can flip them over if I get tired of one side.

Step 2(ish):
Iron your squares. 
You could probably do this later or you might not need to do it at all if your fabric isn't wrinkly but mine was pretty bad so I pressed 'em a bit.

Step 3:
Figure out where your zipper is going to go. 
This is what the zipper looks like in the package. Pick one that's about 4" to 6" smaller than the width of your pillow. This is a 22" zipper for a 26" pillow.

Here's what the zipper looks like when you open it up.

The zipper goes at the bottom of the pillow. So, put your two squares of fabric together, right sides together. If your fabric has a pattern, make sure you've got it going the direction you want it to go. Then lay your zipper on top of the two squares of fabric, at the bottom of the pillow, a couple inches from the edge. Like this. Center the zipper between the two sides.

We're not attaching the zipper yet, we're just using it to measure right now. Place a pin just inside the metal stops on both sides of the zipper. Don't pin the zipper yet, just the two layers of fabric.

Here's the other side. Pin placed just inside the metal stop.

Step 4:
Sew the little space outside of the pins.
My seam allowance is 1 inch so I sewed from the pin toward the edge of the fabric, 1" in from the edge. Like this. Backstitch at the start and stop of this little seam so it stays put.

Do the other side the exact same way.

Step 5:
Sew the space between the pins. 
We just did the little space outside of the pins (I marked the pins in pink), now you're going to connect those two seams. This time however, increase the stitch length all the way on your machine and don't backstitch. We want this seam to come out easily. (Just pretend that line is really straight.) When you're done with this, remember to put your stitch length back to normal for the rest of the project.

Step 6:
Press that seam open.
Now that the bottom of your pillow is sewn together, press that seam open flat. Like this.

Step 7:
Attach the zipper (with pins)
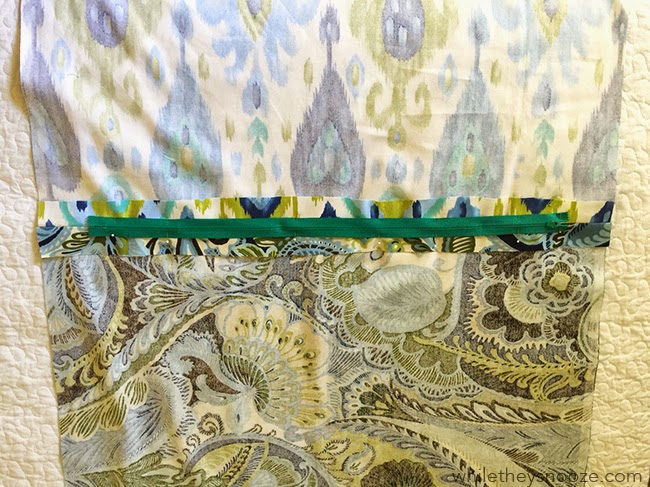
Now, with the pillow squares still laying open flat, place the zipper right on top of that seam you just pressed open. The zipper should be face down. Like this.

Make sure it's in the center and pin it in place.

Step 8:
Sew the zipper! 
To do this you'll need a zipper foot. This is what mine looks like. It's skinny. Like half the size of the other foots.

A zipper foot has two sides. A left and right. If you're sewing on the left side of the zipper (like I am in this picture) the foot is over to the left. That way the needle comes down on the right side of the foot so you can sew right up next to the zipper. Like this.

Just sew all the way down one side ending at the zipper pull. Not gonna lie, this is the tricky part. Once you get here, you're going to run into the pull. To get it out of the way, take whatever pins that are in the way out, raise your presser foot (keep the needle down), and shimmy the zipper pull back behind the needle.


I used the end of a small paint brush to shove it back since my giant man-fingers would't fit. Once you get it behind the needle, continue sewing to the end. Remember to backstitch to keep everything together.

Now swap your foot over (this takes a second... check your manual, it should pop right on and off really easily) and sew the other side of the zipper. In this case I'm sewing down the right so my foot is moved over to the right so the needle comes down close to the right side of the zipper teeth.

Step 9:
Pick open your zipper.
Grab your seam ripper and pick open the loose basting stitch we added between the the pins earlier. It should come out really quickly and your zipper will appear as if by magic. Notice my not-so-stellar sewing job there. Whatevs! It doesn't have to be perfect to work! :)

Step 10:
Sew up the other 3 sides.
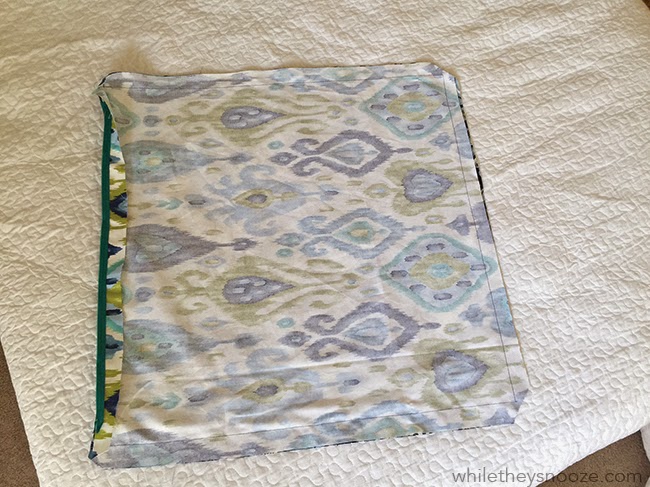
Before you do this, open the zipper! If you don't, you won't be able to flip your pillow right side out. (Been there, done that) Well, you might be able to shimmy the zipper open but it won't be easy. Trust me. You're totally almost done! Once the remaining three sides are sewn up as normal, clip the corners diagonally (so there's not a ton of fabric jammed up in the corners preventing a nice crisp edge). Then, flip the whole thing right side out and YOU'RE DONE!

Now stuff those old cruddy pillows inside and admire your zipper handiwork. :)

I just love that they look so much more fresh and cheery than the brown ones did. If you're wondering, I took these pictures in the guest room since the master bedroom's light sucks and the new duvet is still in internet backorder land.

New pillow front.

New pillow back.

So instead of buying whole new pillows or paying some store too much for their covers, I hope you'll try to make your own! Let me know how it goes and I'll let you know if my duvet ever arrives. :)